
Component · Controller
Arduino Uno
The Arduino Uno is the most common microcontroller board for learning robotics—5V logic, simple to program, hard to break. What it does and when to use it.
What it is
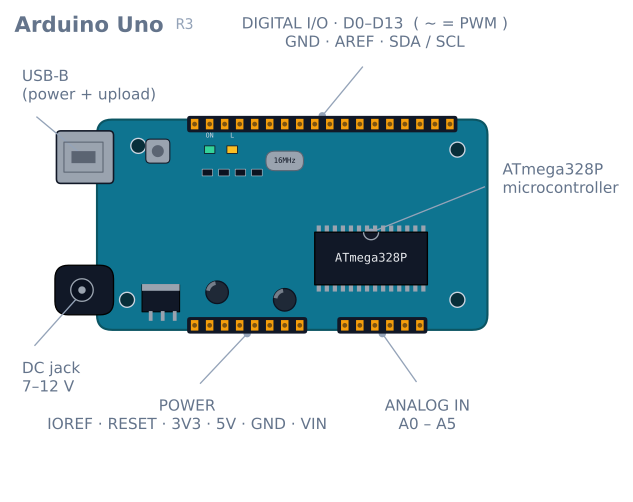
The Arduino Uno is a small development board built around Microchip’s ATmega328P, an 8-bit microcontroller. It exposes the chip’s pins on labelled headers, adds a USB port for programming and power, and handles the fiddly parts—the voltage regulator, the clock crystal, the reset circuit—so you can focus on your code and your wiring. For a huge share of robotics learners, the Uno is how they first make a motor spin or a sensor light up.
Its lasting appeal is not raw power—by modern standards it is slow and memory-starved. It is forgiveness. The 5 V pins tolerate the wiring mistakes beginners make, the community has answered nearly every question you can ask, and almost every hobby sensor and driver ships with example code that assumes an Uno.
How it works
You write a sketch—a C++ program with two functions. setup() runs once when the board powers on; loop() runs forever after that. Inside them you read inputs and drive outputs through the pins:
- Digital pins read or write a HIGH/LOW (5 V / 0 V) signal—a button press, an LED, the direction input of a motor driver.
- PWM pins (marked
~) fake an analog voltage by switching on and off very fast. This is how you set motor speed or LED brightness. - Analog inputs measure a voltage from 0–5 V and report it as a number from 0–1023. This is how you read a potentiometer or an analog line sensor.
The Uno has no operating system. Your code is the only thing running, which makes timing predictable—valuable when you are closing a control loop around a real robot.
When to use it
Reach for an Uno when you are learning, when you want the largest possible pile of compatible tutorials and libraries, or when your robot’s job is simple and real-time: read a few sensors, run a control loop, drive two motors. A line follower, an obstacle-avoider, or a small differential-drive rover are squarely in its comfort zone.
Look elsewhere when you need Wi-Fi or Bluetooth (an ESP32 is the usual upgrade), heavy math or camera vision (a Raspberry Pi), or lots of memory. The Uno’s 2 KB of SRAM fills up faster than beginners expect—long strings and big arrays are the usual culprits.
Common gotchas
- It is a 5 V board. Many modern sensors are 3.3 V and can be damaged by 5 V logic. Check the datasheet before wiring.
- Don’t power motors from the board. The Uno’s regulator can’t supply motor current; use a separate battery and a motor driver. Powering motors directly through the Uno is the most common way beginners brown-out or reset their board.
delay()blocks everything. While the board is in adelay(), it can’t read sensors or react. For anything responsive, track time withmillis()instead.- Watch your memory. If the board behaves erratically for no clear reason, you may be out of SRAM.
Pinout: what each pin can actually do
Fourteen digital pins and six analog, but they are not interchangeable. Six of them have a second job that matters.
| Pin | Also | Notes for a robot |
|---|---|---|
| D0 (RX) | Hardware serial | Do not use. The USB programmer owns it |
| D1 (TX) | Hardware serial | Do not use. Same |
| D2, D3 | External interrupts 0 and 1 | The only two pins that can wake on any edge — reserve them for encoders |
| D3, D5, D6, D9, D10, D11 | PWM (~) |
The six analogWrite pins. Motor speed lives here |
| D10–D13 | SPI (SS, MOSI, MISO, SCK) | Needed for an SD card or an nRF24 radio |
| D13 | Built-in LED | Has an LED and resistor attached — a weak input, fine as an output |
| A0–A5 | Analog in, 10-bit | Also usable as digital pins if you run out |
| A4, A5 | I²C (SDA, SCL) | Shared by every I²C device — using them as analog inputs costs you the bus |
Two of those lines shape most robot designs. D2 and D3 are the only true interrupt pins, which means a robot with two wheel encoders uses both and has none left. And A4/A5 are the I²C bus, so an MPU-6050 plus an analog sensor array on an Uno immediately competes for pins.
This pin pressure is the single most common reason a project outgrows an Uno — not speed, not memory. Fourteen digital and six analog pins disappear quickly once you have a motor driver (6 pins), an encoder pair (4 pins, 2 of them interrupts), and a sensor array (6 analog).
Powering it, and the three ways to get it wrong
| Input | Voltage | Path | Notes |
|---|---|---|---|
| USB | 5 V | Through a resettable fuse | Limited to 500 mA for the whole board |
| Barrel jack | 7–12 V | Through the onboard linear regulator | The recommended supply |
VIN pin |
7–12 V | Same regulator | The same as the jack, exposed as a pin |
5V pin |
5 V | Straight onto the rail | Bypasses the regulator — no protection at all |
The regulator is linear, which means it burns the difference between input and 5 V as
heat. At 12 V in and 200 mA drawn, that is (12 − 5) × 0.2 = 1.4 W in a small package, and
it gets genuinely hot. Feed it 9 V rather than 12 V if you have the choice.
Three specific mistakes worth naming:
Powering motors from the 5 V pin. The regulator cannot supply motor current, so the rail dips, the board resets, and the symptom looks like a software crash. Motors get their own supply and share only ground.
Feeding the 5 V pin from an unregulated source. That pin is directly on the rail, so anything above about 5.5 V goes straight into the ATmega328P.
Powering from USB and the jack at once. The board handles this (there is a comparator that selects the higher source), but a battery on the jack will not charge and can back-feed through a marginal design on a clone.
What the pins can actually supply
| Limit | Value | What it means |
|---|---|---|
| Per pin | 20 mA recommended, 40 mA absolute maximum | One LED is fine. A motor is not. A relay coil is not |
| Total across all pins | 200 mA | Eight LEDs at 20 mA is already the whole budget |
| 5 V pin, USB powered | ~450 mA after the board’s own draw | A servo can exceed this alone |
| 3.3 V pin | 50 mA | Comes from the USB chip’s regulator — very limited |
The 3.3 V pin catches people out regularly. It is not a general-purpose rail; it is a 50 mA convenience. An ESP-01 module trying to transmit will brown out on it immediately.
The 2 KB memory problem
The Uno has 32 KB of flash for your program and 2 KB of SRAM for its variables while running. Flash is rarely the constraint. SRAM is, constantly.
Every string literal in a Serial.print is copied into SRAM at startup:
Serial.println("Calibration complete, entering drive mode"); // 43 bytes of SRAM, foreverTwenty such messages is 800 bytes — 40% of the total. The fix is F(), which leaves the
string in flash and reads it as needed:
Serial.println(F("Calibration complete, entering drive mode")); // 0 bytes of SRAMArrays are the other consumer. A float is 4 bytes, so a 200-sample logging buffer is 800
bytes and there is no warning at all — the compiler reports flash usage happily and says
nothing useful about runtime SRAM.
The symptom of running out is not a clean error. The stack grows down, the heap grows up, and when they meet, variables silently corrupt each other. The board behaves erratically: readings that make no sense, a loop that skips, a reset with no cause. If an Uno starts behaving irrationally after you added a feature, suspect SRAM before anything else.
// Drop this in and watch it while you develop.
int freeRam() {
  extern int __heap_start, *__brkval;
  int v;
  return (int)&v - (__brkval == 0 ? (int)&__heap_start : (int)__brkval);
}
Under about 200 bytes free, expect trouble.
Troubleshooting
| Symptom | Likely cause | Fix |
|---|---|---|
| Resets when motors start | Motor current through the board | Separate motor supply, common ground only |
| Upload fails: “not in sync” | Something on D0/D1, or wrong port | Disconnect anything on the serial pins |
| Erratic behaviour after adding code | Out of SRAM | Wrap literals in F(); check freeRam() |
analogWrite does nothing |
Pin is not PWM-capable | Use 3, 5, 6, 9, 10 or 11 |
| Servo library breaks PWM on 9/10 | Servo takes over Timer 1 |
Use other PWM pins, or drive servos from a PCA9685 |
| I²C device not found | A4/A5 used for something else | The I²C bus is those two pins, exclusively |
| Regulator very hot | Input near 12 V | Drop to 7–9 V |
| 3.3 V device browns out | 50 mA limit on that pin | Use a separate 3.3 V regulator |
| Sensor reads nonsense | 3.3 V sensor on 5 V logic | Level-shift, or use a 3.3 V board |
Uno or something else?
| Board | Logic | Why choose it |
|---|---|---|
| Uno | 5 V | Forgiving, universally documented, socketed chip you can replace |
| Nano | 5 V | Same chip, breadboard-friendly, 8 analog pins instead of 6 |
| Mega 2560 | 5 V | 54 digital, 16 analog, 6 interrupts, 8 KB SRAM — the answer to pin pressure |
| ESP32 | 3.3 V | Wi-Fi, Bluetooth, dual core, vastly faster |
| Pro Micro | 5 V | Native USB — can pretend to be a keyboard or mouse |
The Nano deserves particular mention for robots: it is the same ATmega328P with the same code, and it breaks out A6 and A7 as extra analog inputs. For an 8-channel reflectance array that is the difference between fitting and not fitting, which is exactly why line-follower builds so often specify a Nano.
The honest summary: the Uno’s value is that everything works on it the first time. Every library, every tutorial, every wiring diagram assumes it. That is worth more while learning than any specification, and when you outgrow it, the thing you outgrew will almost always be the pin count.
Explore the graph
Used in these builds
Projects, learning paths, and simulators that include the Arduino Uno.
- ProjectBuild a 4-DOF Robot Arm: PCA9685, Servos, and Kinematics
- ProjectBuild a GPS Waypoint Rover That Drives Itself
- ProjectBuild a Line Follower Robot: From Simulator to Real Track
- ProjectBuild a Line Maze Solver Robot With LSRB Route Memory
- ProjectBuild a Micromouse: A Flood-Fill Maze-Solving Robot
- ProjectBuild a Mini Sumo Robot: Grip, Wedge and Edge Sense
- ProjectBuild a Pen Plotter: Two Stepper Axes That Arrive
- ProjectBuild a Phone-Controlled Robot Car Over Bluetooth or Wi-Fi
- ProjectBuild a Pick-and-Place Robot That Knows It Missed
- ProjectBuild a Room Coverage Robot That Sweeps a Floor
- ProjectBuild a ROS 2 Robot That Sees and Drives to a Marker
- ProjectBuild a Self-Balancing Robot With an MPU6050 and PID
- ProjectBuild an Obstacle-Avoiding Robot: Sense, Scan, and Steer
- Learning pathRobot Electronics Foundations: A Learning Roadmap
Compare
Alternatives
Questions
Arduino Uno FAQ
What is the Arduino Uno?
The Arduino Uno is a beginner-friendly microcontroller board built around the ATmega328P chip. It lets you read sensors and control motors, LEDs, and other electronics with short C++ programs called sketches, and it is the board most people learn robotics on.
What is the Arduino Uno used for in robotics?
In robotics the Uno acts as the robot's brain: it reads sensors, runs a control loop, and drives motors through a driver such as the L298N. It suits line followers, obstacle-avoiders, and small rovers where the job is simple and needs predictable, real-time timing.
Which microcontroller is used in the Arduino Uno?
The Arduino Uno uses Microchip's ATmega328P, an 8-bit AVR microcontroller running at 16 MHz with 32 KB of flash and 2 KB of SRAM. The board adds a USB interface, a voltage regulator, and pin headers around that single chip.
Is the Arduino programmed in C or C++?
Arduino sketches are written in C++ with a simplified, beginner-friendly framework layered on top. You can use plain C too, since C is largely a subset of C++, but the standard Arduino functions and libraries are C++.
Is Arduino code difficult to learn?
No—Arduino is one of the gentlest ways into programming hardware. The two-function structure of setup and loop, a huge library ecosystem, and thousands of example sketches mean a beginner can blink an LED or spin a motor within an hour.
Which is better for robotics, Arduino or Raspberry Pi?
They solve different problems. Arduino is a microcontroller—great for real-time control of motors and sensors with predictable timing. A Raspberry Pi is a full Linux computer—better for vision, heavy computation, or Wi-Fi. Many advanced robots use both: a Pi to think and an Arduino to act.
Why is the Arduino Uno so widely used?
Because it is forgiving and well-supported. Its 5 V pins tolerate the wiring mistakes beginners make, nearly every hobby sensor ships with Uno example code, and the community has answered almost every question—so you are rarely stuck for long.
Can I use ChatGPT or AI to write Arduino code?
Yes—AI assistants can draft and debug Arduino sketches and are a useful learning aid. Always test AI-generated code on the hardware before trusting it, because a plausible-looking sketch can still have the wrong pin numbers, timing, or logic.
Further reading