
Component · Actuator
SG90 Servo Motor
The SG90 is the tiny 9-gram servo behind most beginner robot joints and steering. How a servo holds an angle, what it can lift, and how to drive it.
What it is
The SG90 is a micro servo: a self-contained little actuator that rotates to a commanded angle and holds it there. Where a plain DC motor just spins, a servo aims—tell it “90 degrees” and it drives itself to 90 degrees and resists being pushed away. That makes it the natural choice for anything that needs to move to a known position: a robot arm joint, a gripper that opens and closes, a pan-tilt mount for a camera, or the steering on a small rover.
At nine grams and a couple of dollars it is the servo almost everyone starts with. It is not strong or precise enough for serious work, but it is the fastest way to understand how position control feels.
How it works
Crack one open and you find four things: a small DC motor, a gear train that trades speed for torque, a potentiometer geared to the output shaft, and a control circuit. The potentiometer is the trick—it continuously reports the shaft’s actual angle. The circuit compares that measured angle to the angle you are commanding and drives the motor in whichever direction closes the gap. It is a complete feedback loop in miniature, which is exactly why the inverse-kinematics arm can trust a servo to reach a target pose.
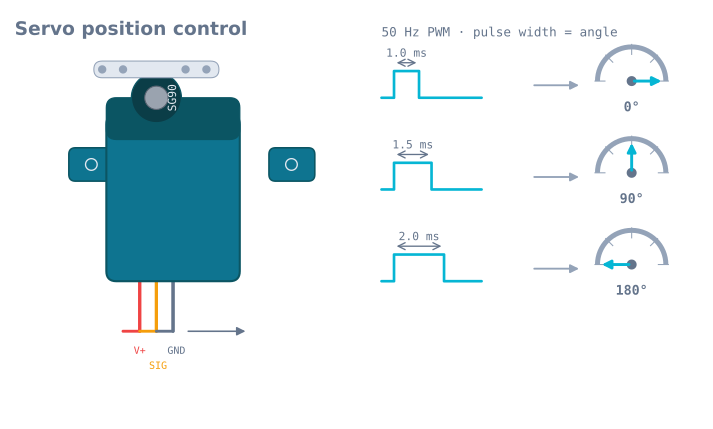
You command the angle with a 50 Hz PWM signal, and the pulse width carries the message: roughly 1 ms for one end of travel, 1.5 ms for centre, 2 ms for the other end. This is PWM used as a position code rather than a speed code. In practice the Arduino Servo library hides the timing and you just write an angle.
When to use it
Use an SG90 whenever a robot part must move to and hold a specific angle under light load: gripper fingers, small arm joints, sensor gimbals, or the steering linkage on a lightweight car. Its ~180° range and instant “go to this angle” control are ideal for learning kinematics and building expressive mechanisms.
Look elsewhere when the joint carries real weight (use a metal-gear or standard servo), when you need continuous rotation for a wheel (use a DC motor and an L298N, or a continuous-rotation servo), or when you need many degrees of precise, high-torque motion (use a stepper).
Wiring and gotchas
- Power it separately. A stalling SG90 can pull 500–700 mA—far more than a microcontroller’s 5 V pin can give. Use a dedicated 5 V supply and tie its ground to the board’s ground, or the board will brown out and reset.
- It is not continuous rotation. A standard SG90 travels ~180° and stops. Commanding “spin forever” does nothing; for a driven wheel you need a different actuator.
- Don’t force it or stall it. The nylon gears strip under overload or a sharp knock. Keep loads light, or move to metal gears.
- Expect a little jitter. Cheap servos hunt slightly around the target. A stable, clean power supply and detaching the signal when the joint doesn’t need holding both reduce it.
Wiring
Three wires, and the colours are near-universal on hobby servos:
| Wire | Colour (SG90) | What it is |
|---|---|---|
| 1 | Brown | Ground |
| 2 | Red | Power, 4.8–6 V |
| 3 | Orange | Signal — the 50 Hz PWM |
Some servos use black/red/white or black/red/yellow. The rule that always holds: red is in the middle, and ground is the darkest of the three.
| SG90 | Arduino Uno | Note |
|---|---|---|
| Brown | GND | Must be common with the servo supply’s ground |
| Red | Not the Arduino’s 5 V | A separate 5 V supply — see below |
| Orange | Any digital pin | The Servo library works on any pin |
Why not the Arduino’s 5 V pin
An SG90 draws about 10 mA idle, 150–250 mA moving, and 650 mA stalled. The USB supply an Uno runs from is limited to 500 mA for the whole board, and the onboard regulator when running from a barrel jack has its own thermal limit.
One servo moving gently often works, which is exactly the problem: it works on the bench and then browns out the moment the servo meets resistance. The symptom is a board that resets whenever the arm reaches a particular position — which reads as a software bug.
Give it its own 5 V supply, tie the grounds, and put a 470 µF capacitor across the servo’s supply close to the connector.
The pulse width to angle relationship
A servo does not read voltage. It reads how long the pulse is, fifty times a second.
| Pulse width | Nominal angle | What the SG90 actually does |
|---|---|---|
| 1.0 ms | 0° | Often stops around 10–15° short |
| 1.5 ms | 90° | Centre, and usually accurate |
| 2.0 ms | 180° | Often stops around 10–15° short |
| < 0.5 ms or > 2.5 ms | — | Buzzes against an end stop, drawing stall current |
The 1–2 ms range is a convention, not a standard. Many SG90s reach their true end stops
closer to 0.6 ms and 2.4 ms, which is why the Arduino Servo library’s attach() takes
optional minimum and maximum pulse widths:
servo.attach(9, 600, 2400); // instead of the 544/2400 defaultsCalibrating this per servo is the difference between an arm that reaches its workspace and one that is mysteriously 20° short at both ends.
Minimal working code
#include <Servo.h>

Servo joint;
const int PIN = 9;

void setup() {
  joint.attach(PIN, 600, 2400);   // calibrate these two numbers per servo
  joint.write(90);                 // centre before doing anything else
  delay(500);
}

// Move gently instead of jumping — a servo commanded to jump goes at full speed.
void sweepTo(int target, int stepDelayMs) {
  int current = joint.read();
  int step = (target > current) ? 1 : -1;
  while (current != target) {
    current += step;
    joint.write(current);
    delay(stepDelayMs);
  }
}

void loop() {
  sweepTo(20, 15);
  delay(400);
  sweepTo(160, 15);
  delay(400);
}
joint.write(160) and the sweep both end at 160°, but they are completely different events
electrically. The jump commands full speed, which on a loaded joint is a 650 mA spike and a
mechanical shock through nylon gears. The sweep spreads the same move over two seconds and
draws a fraction of the current. On a multi-joint arm this is the difference between a supply
that copes and one that does not.
Torque: what 1.8 kg·cm actually means
The specification is 1.8 kg·cm at 4.8 V — meaning the servo can hold 1.8 kg at 1 cm from the shaft, or 1.8/L kg at L centimetres. That last part is what catches people out.
| Arm length from the shaft | Maximum load (stall) | Safe working load (~30%) |
|---|---|---|
| 1 cm | 1800 g | 540 g |
| 5 cm | 360 g | 108 g |
| 10 cm | 180 g | 54 g |
| 15 cm | 120 g | 36 g |
Two things to take from this. First, torque falls off linearly with reach, so a 15 cm arm segment can lift only 120 g at absolute stall. Second, never design to the stall figure. A servo at stall is drawing full current, producing no motion, and heating; a third of stall torque is a sensible ceiling for a joint that has to hold a position for any length of time.
The figure is also given at 4.8 V. At 6 V the same servo produces roughly 2.2 kg·cm, which is one of the few free upgrades in hobby robotics — provided your supply can deliver the correspondingly higher current.
Reducing jitter
Cheap servos hunt slightly around their target, and there are four separate causes worth distinguishing:
- Supply noise. The most common. A servo shares a rail with motors and sees every current spike as a control disturbance. Separate supply, plus a capacitor at the servo.
- Signal timing jitter. The
Servolibrary generates pulses in software, and a busy loop or another interrupt shifts their edges. Moving to a PCA9685 fixes this completely — it generates the pulses in hardware. - Deadband. The servo’s own controller ignores errors below roughly 5 µs of pulse width, which is about 1°. Below that resolution it simply will not respond, and asking for finer steps produces nothing.
- Holding against a load. A servo fighting gravity at the edge of its torque will buzz
continuously.
detach()when the joint does not need to hold, or mechanically balance the joint.
Troubleshooting
| Symptom | Likely cause | Fix |
|---|---|---|
| Board resets when the servo moves | Servo current through the Arduino | Separate 5 V supply, common ground, 470 µF capacitor |
| Buzzes constantly, gets warm | Commanded past its end stop | Narrow the pulse-width range in attach() |
| Only travels about 150° | Library defaults do not reach the true stops | attach(pin, 600, 2400) and tune |
| Moves to the wrong angle entirely | Horn fitted at an arbitrary rotation | Every joint needs a calibration offset — and maybe a sign flip |
| Jitters at rest | Supply noise or software-timed pulses | Capacitor first; a PCA9685 if it persists |
| Stripped and now slips | Nylon gears failed under shock or overload | Metal-gear MG90S; reduce the load or the speed |
| Slower and weaker over time | Supply sagging as the battery drains | Torque scales with voltage — measure the rail under load |
| Will not rotate continuously | It is a positional servo | Use a continuous-rotation servo or a DC gearmotor |
SG90 or something else?
| Part | Torque @ 4.8 V | Gears | Choose it when |
|---|---|---|---|
| SG90 | 1.8 kg·cm | Nylon | Learning, light grippers, sensor gimbals |
| MG90S | 2.2 kg·cm | Metal | Same size, survives shocks — the drop-in upgrade |
| MG996R | 9.4 kg·cm | Metal | Standard-size joints carrying real weight |
| Continuous-rotation SG90 | — | Nylon | A driven wheel, where you want speed not angle |
| NEMA 17 stepper | ~40 N·cm | — | Precise, repeatable positioning with no deadband |
One warning about “light grippers” in that first row. A gripper is the one application where an SG90 spends its life stalled — holding an object is not motion, so the winding takes roughly 0.5 A with nothing to cool it, and that is the usual way these die. It is also why the jaw force is set by the lever arm rather than by the torque on the box: 0.176 N·m over a 30 mm finger is 5.87 N at stall and about 4.11 N you can actually hold. Sizing a servo gripper covers both, and the gripper simulator will do the arithmetic for your own finger.
The honest summary: the SG90 is a learning actuator. It is the fastest way to understand what position control feels like, and it is not strong or repeatable enough for a joint that matters. When a project stops working because the servo is not good enough, the MG90S is usually the answer — same footprint, same wiring, metal gears.
Explore the graph
Used in these builds
Projects, learning paths, and simulators that include the SG90 Servo Motor.
Compare
Alternatives
Questions
SG90 Servo Motor FAQ
What is the SG90 servo motor?
The SG90 is a 9-gram hobby servo—a small geared motor that rotates to and holds a commanded angle, rather than spinning freely. It is the cheapest, most common servo for beginner robotics, used for arm joints, grippers, pan-tilt camera mounts, and steering.
How does a servo motor work?
Inside is a DC motor, a gear train, a potentiometer, and a control circuit. The potentiometer tells the circuit the current angle; the circuit compares it to the angle you command and drives the motor until they match. That built-in feedback loop is what lets a servo hold a precise position.
How do you control an SG90 with an Arduino?
You send a 50 Hz PWM signal where the pulse width sets the angle: about 1 ms means 0°, 1.5 ms means 90°, and 2 ms means 180°. In practice you use the Arduino Servo library and just call servo.write(angle)—it generates the timing for you.
How much weight can an SG90 lift?
The SG90's stall torque is about 1.8 kg·cm, meaning it can just hold 1.8 kg at a 1 cm arm, or ~180 g at 10 cm. Usable continuous load is well below that. For anything heavier or a longer arm, step up to a metal-gear servo like the MG90S or a standard-size servo.
SG90 vs MG90S—which is better?
They are the same size and control the same way, but the MG90S has metal gears and slightly more torque, so it survives stalls and load that would strip the SG90's nylon gears. Use the SG90 to learn and for light loads; choose the MG90S when the joint carries real weight or takes knocks.
How much current does an SG90 draw?
An SG90 draws only a few milliamps idle but can spike to 500–700 mA when it stalls or moves under load. That is too much to pull from an Arduino's 5 V pin, so power servos from a separate 5 V supply with a common ground, or you will brown out and reset the board.
Further reading